Here you will find some notes and a few lines of code on building a simple API service using AWS to speed up the process. The main motivation was to test AWS Cognito and API Gateway Usage Plans features I never had time to work on but looked promising (if you want to start by testing the API, just go
to invoicing.services website :).
Part I. AWS Cognito for sign-up and sign-in.
I always code the same user database, registration forms and authentication lines of code when I start a new project. And that's why I wanted to test AWS Cognito to get an already built user database and a simple
out-of-the-box API to manage the sign-in and sign-up processes.
Also, because I usually design software blocks to use AWS services, the use of AWS Cognito will allow me to give granular access to AWS resources 'natively'.

AWS Cognito Javascript SDK
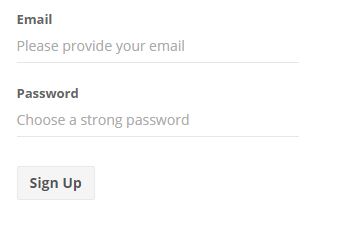
To start using AWS Cognito, you just need to create a new USER POOL by setting up a few
options, like the attributes you want to save for USERS (email, name, etc). That only takes a few minutes, and once your user pool is ready you can start registering users with just a few lines of code (in my scenario, I used
the Javascript SDK but there is also an iOS, Android and .NET SDK). For example, by calling the signUP
API method, AWS Cognito checks the registration values and creates a new user on your pool (if everything is ok).
AWSCognito.config.region = 'us-west-2';
var poolData = {
	UserPoolId: 'your cognito user pool id',
	ClientId: 'your cognito app client id'
};
var userPool = new AWSCognito.CognitoIdentityServiceProvider.CognitoUserPool(poolData);
var cognitoUser = null;

function signup() {

	var attributeList = [];
	var dataEmail = {
		Name: 'email',
		Value: email.toLowerCase()
	};

	var attributeEmail = new AWSCognito.CognitoIdentityServiceProvider.CognitoUserAttribute(dataEmail);
	attributeList.push(attributeEmail);

	userPool.signUp(guid(), password, attributeList, null, function (err, result) {
		if (err) {
			showRegistrationError(err);
			return;
		}
		cognitoUser = result.user;
	});
}
AWS Cognito sets the username attribute as the pool database 'primary key'. For coding invoicing.services I just wanted to ask users
for the email, so we set a guid value as the username when calling the signUp function.
Ok, by just spending some minutes we already have a user database and a simple procedure (AWS SDK) to sign up our users. Similarly, for the sign-in process we call authenticateUser and AWS Cognito
sends to us the tokens required for authentication when calling for AWS resources. There is no more need for using a shared key on your client application to access AWS.
function login() {

	var authenticationData = {
		Username: email.toLowerCase(),
		Password: password,
	};
	var authenticationDetails =
		new AWSCognito.CognitoIdentityServiceProvider.AuthenticationDetails(authenticationData);

	var userData = {
		Username: email.toLowerCase(),
		Pool: userPool
	};

	cognitoUser = new AWSCognito.CognitoIdentityServiceProvider.CognitoUser(userData);
	cognitoUser.authenticateUser(authenticationDetails, {
		onSuccess: function (result) {

		/*	Use the idToken for Logins Map when Federating User Pools with
			Cognito Identity or when passing through an Authorization Header to an API
			Gateway Authorizer
		*/

		Cookies.set('accessToken', result.getAccessToken().getJwtToken());
		Cookies.set('idToken', result.idToken.jwtToken);
		Cookies.set('refreshToken', result.refreshToken.token);

		var refreshToken = new AWSCognito.CognitoIdentityServiceProvider.CognitoRefreshToken({
			RefreshToken: result.refreshToken.token,
			IdToken: result.idToken.jwtToken
		});

		},
		onFailure: function (err) {
			showLoginError(err);
		},
	});
}
The tokens you get from AWS Cognito are valid for 1 hour and must be refreshed before they expire. For invoicing.services website I simply
schedule a refresh tokens call every 50 minutes using javascript setTimeout function.
function refreshTokens() {
	userPool.client.makeUnauthenticatedRequest('initiateAuth', {
		ClientId: poolData.ClientId,
		AuthFlow: 'REFRESH_TOKEN_AUTH',
		AuthParameters: {
			"REFRESH_TOKEN": refreshToken
		}
	}, function (err, authResult) {
		if (!err) {
			saveTokens(authResult);
		} else
			window.location.href ="/index.html";
	});
	// refresh after 50 minutes.
	setTimeout(refreshTokens, 3000000);
}
Part II. API Gateway Usage Plans
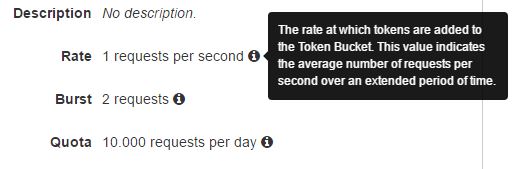
Amazon recently introduced a new feature to setup usage limits for your exposed API methods. AWS API Gateway Usage Plans allows you to define how many requests a user can make per second and the number of total calls per period. AWS will do all the magic every
time your users calls your API. You only need to manage the list of API KEYs that are allowed to access your methods.
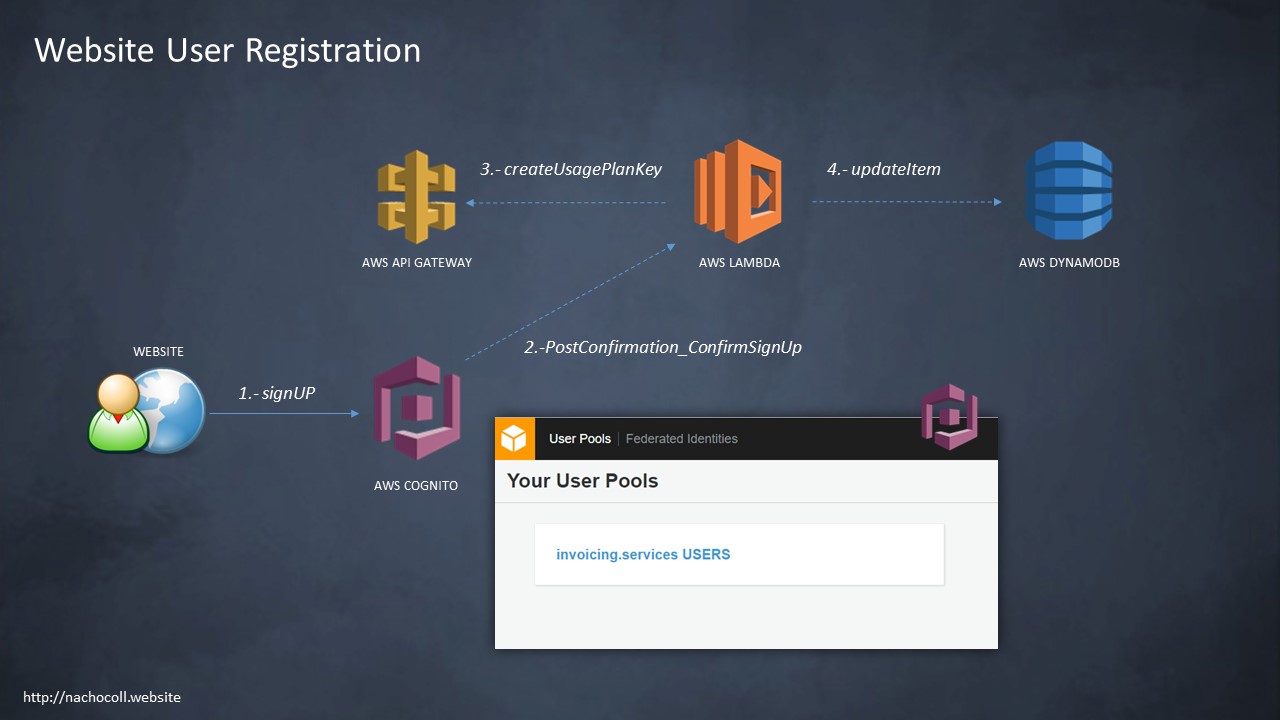
As an example, if you define a BASIC usage plan and a PREMIUM usage plan you only need to call createUsagePlanKey to assign a user API Key to the plan he's allowed to use.
Take a look on invoicing.services real world example. This code is triggered when a new user is validated by AWS Cognito, and calls createApiKey and
createUsagePlanKey methods to create a new KEY and assign it to an AWS APIGateway Usage Plan.
								[..]

// creates a new API KEY fo the user.
apigateway.createApiKey(params, function(errAPIKEY, dataAPIKEY) {
  if (errAPIKEY) console.log(errAPIKEY, errAPIKEY.stack);
  else {
		// assigns the user API KEY to the usage plan.
		var params = {
		  keyId: dataAPIKEY.id, /* required */
		  keyType: 'API_KEY', /* required */
		  usagePlanId: 'your usage plan id'
		};

		apigateway.createUsagePlanKey(params, function(errUSAGEPLAN, dataUSAGEPLAN) {
		  if (errUSAGEPLAN) console.log(errUSAGEPLAN, errUSAGEPLAN.stack);
		  else
		  	// save API KEY user database.
			saveUserAPIKey();
		});

	}
});

[...]
Remember to save the user API KEY somewhere to fetch and show it to the user.
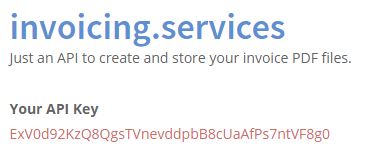
Everything is setup here, and our AWS Cognito registered users can start using our API
Gateway Usage Plans by including the provided API KEY ^_^.
								$.ajax({
	method: 'POST',
	url: 'https://pizbsgyvh4.execute-api.us-west-2.amazonaws.com/v1/invoice/add',
	data: JSON.stringify(invoiceJson),
	headers: {
		'Content-Type': 'application/json',
		'X-Api-Key': key
	},
	dataType: 'json',
	success: function (response) {
		console.log(response.pdfFileURL);
	},
	error: function (xhr, textStatus, errorThrown) {
		console.log(xhr);
	}
});
That's all folks!